Installation
This guide will help you install the QLLVM project, including installation from plugins and installation from source code.
Installation from Plugins
We provide two VSCode plugins that allow you to use the QLLVM compiler directly without local installation:
qcoder-chat: Quantum programming assistant, providing AI dialogue programming, intelligent code completion, and autonomous Agent task execution.
qcoder-compiler: Quantum compilation tool, supporting multi-compiler parallel compilation, QIR simulator running, and other functions.
Install from VSCode Extension Store
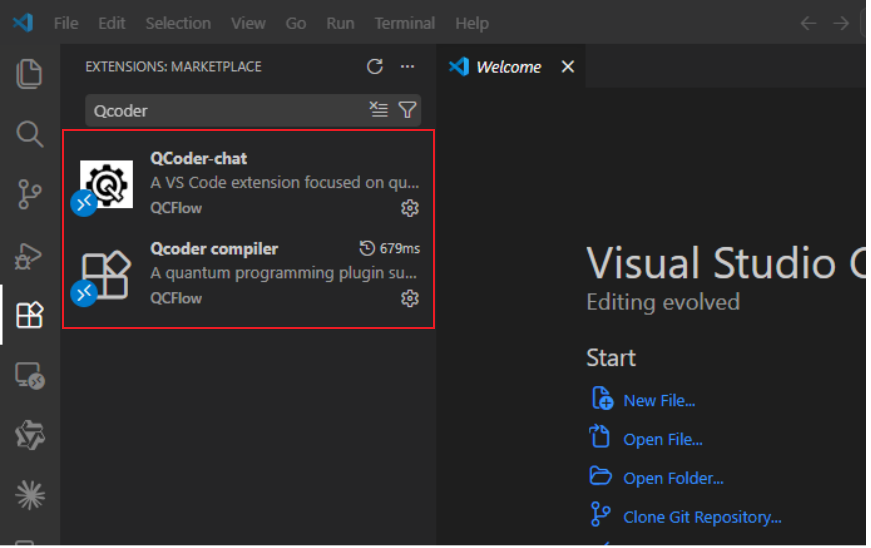
VSCode Extension Store Search
Install plugins with one click through cloud VSCode, simple and quick:
Open the Extensions panel on the left side of cloud VSCode (shortcut: Ctrl+Shift+X);
Enter
qcflow-publisher.qcoder-chatin the extension search box and search;Click the Install button, the system will automatically install the following two plugins:
qcflow-publisher.qcoder-chatqcflow-publisher.qcoder-compiler
After installation is complete, the plugins will take effect automatically, and you can use intelligent programming, compilation, and running services.
Install from VSIX File
1. Get plugin installation packages
Download the plugin installation packages from the repository:
./plugin/qcflow-publisher.qcoder-compiler-0.1.0.vsix./plugin/qcflow-publisher.qcoder-chat-0.1.1.vsix
2. Install VSIX files
① Open command palette
|
Use shortcut Ctrl+Shift+P (Windows/Linux) or Cmd+Shift+P (macOS) |
② Enter and select command
|
|
③ Select files
|
Select the downloaded |
Basic Configuration
Quantum Compiler Configuration
Open compiler settings: Type Open Quantum Compiler Settings in the command palette
Enable compilers: Check the compilers you need in the configuration interface (such as QLLVM, Qiskit, QPanda)
Configure compiler parameters:
QLLVM: Set device type (NISQ/FTQC), backend type (qasm-backend/benyuan/tianyan/zheda), optimization level (O0/O1), etc.
Python environment: Supports automatic detection of system Python, virtual environments (venv/conda), or manually specifying interpreter path
qcoder-chat Configuration

Add model information through Model Management
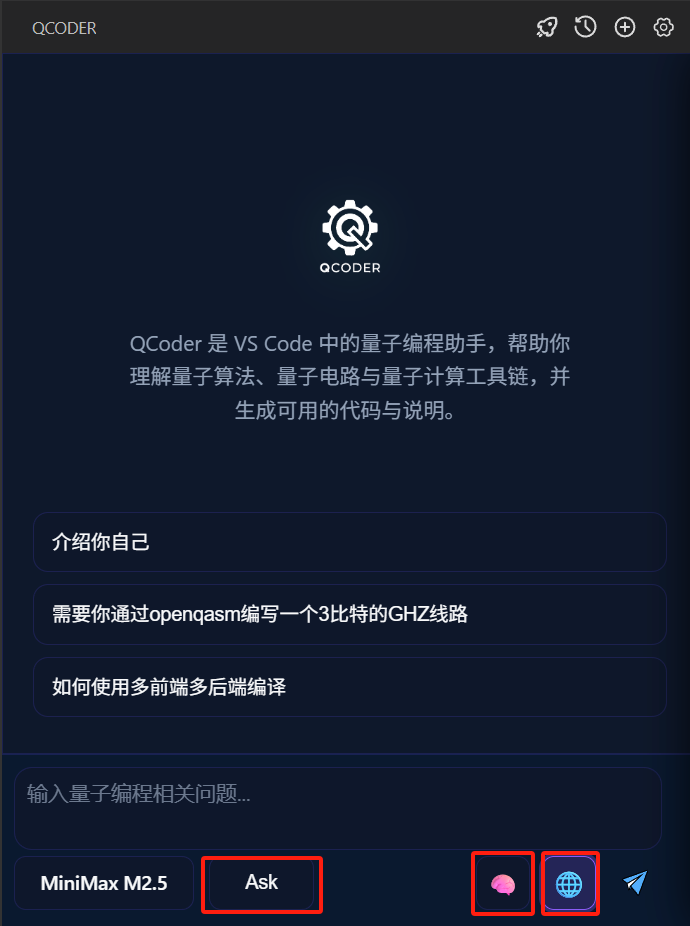
Optional configuration:
Ask/Agent mode: Ask mode only provides chat interaction functionality; Agent mode provides tools for writing files, querying error information, calling QLLVM compilation, calling QLLVM running, etc.
Deep thinking mode: Used to select whether the large model performs deep thinking. Some models can only think deeply due to their own limitations and cannot be canceled.
Online service: Used to enable quantum field-specific knowledge base, enhancing quantum programming capabilities through RAG technology.
Installation from Source
If you need to use QLLVM command line tools directly in your local environment or perform custom development, you can choose to compile and install from source code.
Environment Requirements
Dependency |
Version Requirement |
|---|---|
LLVM precompiled version |
12.0.0 |
Ubuntu version |
20.04+ |
Python version |
3.10+ |
Common Dependencies
Execute the following commands in the system to install system basic dependencies
# System basic dependencies
sudo apt-get update
sudo apt-get install -y build-essential cmake ninja-build \
  libcurl4-openssl-dev libssl-dev liblapack-dev libblas-dev \
  lsb-release git
# Additional dependencies
sudo apt-get install -y libantlr4-runtime-dev libeigen3-dev
LLVM/MLIR: QLLVM requires LLVM with MLIR. It is recommended to use a pre-built package, or build from source using llvm-project-csp (enable clang;mlir).
Download and Install LLVM 12.0.0 Pre-built Package
Download and extract to $HOME/.llvm:
# Use wget to download and extract directly
wget https://github.com/llvm/llvm-project/releases/download/llvmorg-12.0.0/clang+llvm-12.0.0-x86_64-linux-gnu-ubuntu-20.04.tar.xz
tar -xf clang+llvm-12.0.0-x86_64-linux-gnu-ubuntu-20.04.tar.xz
mv clang+llvm-12.0.0-x86_64-linux-gnu-ubuntu-20.04 ~/.llvm

# Add LLVM to environment variables:

echo 'export PATH="$HOME/.llvm/bin:$PATH"' >> ~/.bashrc
echo 'export LLVM_HOME="$HOME/.llvm"' >> ~/.bashrc
echo 'export LD_LIBRARY_PATH="$HOME/.llvm/lib:$LD_LIBRARY_PATH"' >> ~/.bashrc
source ~/.bashrc

# Install dependency packages:
sudo apt install zlib1g-dev libtinfo-dev
QLLVM Build
# Clone repository
git clone https://github.com/QCFlow/QLLVM.git
cd QLLVM

# Build and install
mkdir build && cd build
cmake .. -G Ninja \
  -DQLLVM_QASM_ONLY_BUILD=ON \
  -DLLVM_ROOT=$HOME/.llvm
ninja
ninja install
Installation path: Default installation to ~/.qllvm. During ninja install, it will automatically add ~/.qllvm/bin to the current user’s shell configuration (.bashrc/.profile). It can be used after opening a new terminal. You can also add it manually:
export PATH=$PATH:$HOME/.qllvm/bin
Verification and Testing
# Run test script
./scripts/test_openqasm_only.sh

# Manual verification
qllvm test/test_bell.qasm -qrt nisq -qpu qasm-backend -O1
cat test/test_bell_compiled.qasm
Optional Dependencies (install as needed)
Function |
Dependency |
Installation Method |
|---|---|---|
QIR Runner Simulator |
qir-runner, Python 3.9+ |
|
C++ + CUDA + QASM Hybrid Program Compilation |
CUDA Toolkit, nvcc, qir-runner |
See CUDA Environment below |
CUDA Environment (only needed for C+++CUDA+QASM hybrid)
If you need to compile examples/hybrid_cuda and other C++ + CUDA + QASM hybrid programs, you need to install CUDA Toolkit.
Method 1: Ubuntu apt installation (recommended)
# Execute in the qllvm repository root directory
bash scripts/install_cuda_apt.sh
The script will install nvidia-cuda-toolkit and create a Clang compatible directory ~/.qllvm/cuda-apt-compat. After installation, when nvcc is available, qllvm will automatically use nvcc to compile .cu files.
Method 2: NVIDIA official runfile
Download runfile from [NVIDIA CUDA download page](https://developer.nvidia.com/cuda-downloads), execute --toolkit to install only the toolchain. After installation, set:
export CUDA_PATH=/usr/local/cuda
export PATH=$CUDA_PATH/bin:$PATH
Note: Compiling hybrid programs does not require a physical GPU; running the generated hybrid_app requires an NVIDIA graphics card and driver.
Troubleshooting
If you encounter problems during installation, please try the following solutions:
Dependency issues: Ensure all dependencies are correctly installed
LLVM version: Ensure the LLVM version used is compatible with QLLVM
Permission issues: Use administrator privileges or sudo to install
Network issues: Ensure network connection is normal, especially when cloning code from GitHub